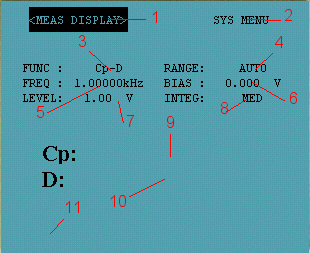
1. Displays the default softkey configuration for this screen. 2. Same as 1. 3. Sets the measurement function. 4. Sets the measurement range. 5. Sets the measurement frequency. 6. Sets internal dc bias voltage/current value. 7. Sets oscillator level voltage/current value. 8. Sets integration time (SHORT/MED/LONG). 9 & 10. Displays measurement results. 11. Displays errors and miscellaneous information. |
To change or enter source channel parameters on this page,move the cursor to the desired field and enter the parameter value with the DATA ENTRY keys of the front panel or computer keyboard.
Each time an entry is made the cursor automatically moves to the next field.
When entering numeric values on this page, it is not necessary to enter the value unit. The unit for voltage values is V (volt); for current values, A (ampere); and for time values, s (seconds). When the ENTER key is pressed the unit will be automatically entered. Also, each time a numerical value is inserted in a field, softkeys change and provide the possible units for the field. By pressing a softkey, value will be entered in the selected field using the unit displayed in the softkey pressed. Voltage, current and frequency limits for each field are listed below:
FREQ Frequency Range 20Hz to 1MHz BIAS Voltage Range 0 to ±40V Current Range 0 to ±100mA LEVEL Voltage Range 0 to 20V Current Range 0 to 200mA
Values are entered in fixed decimal format.
Measurement Function can be selected with the softkeys when the cursor is in the FUNC field. The following functions are available:
Cp-D Capacity and Deviation
Measurement range is set to AUTO by default. This means that optimum range is automatically selected for each measurement. Measurement range can only be set to AUTO.
The HP4284A operates from 20 Hz to 1 Mhz with 8610 frequency steps in between. When numeric data is entered, the nearest available frequency point is automatically set.
There are two ways to set the test frequency. One is to use the softkeys, and the other is to use the numeric entry keys. Perform the following steps to set the test frequency:
- Move the cursor to the FREQ field. The following softkeys will be displayed:
- INCR 1 - Increments the value up to the next sequentially higher decade value
- INCR 2 - Increments the value up to the next sequentially higher frequency point
- DECR 2 - Decrements the value down to the next sequentially lower frequency point
- DECR 1 - Decrements the value down to the next sequentially lower decade value
- Select and set the test frequency using either the softkeys or the numeric entry keys. When the test frequency is entered using the numeric entry keys, the softkey labels are changed to the available units ('Hz', 'kHz','Mhz'), and so you can use these softkeys instead of the ENTER key to enter the units and enter the data. When the enter key is used, the numeric data is entered with Hz as the default unit.
The HP 4284A with option 001 installed and Hi-PW field on has internal bias voltage selections of 0V to ±40 V. The dc bias current can be set from 0 to ±100 mA.
Front panel operation for setting the DC Bias:
- Move the cursor to the BIAS field. The following softkeys will be displayed:
- INCR: increases the dc bias level
- DECR: decreases the dc bias level
- Set the dc bias to your desired bias using either the softkeys or the numeric entry keys. When the dc bias is entered using the numeric entry keys, the softkey labels are changed to the available units ('mV', 'V', 'uA', 'mA' and 'A'), and so you can use these softkeys instead of the ENTER key. When the ENTER key is used, the numeric data is entered with V or A as the default unit.
The HP 4284A's oscillator level can be set as the effective value (RMS value) of a sine wave of the test frequency from the HP 4284A's internal oscillator. You can set either the oscillator voltage level or the oscillator current level.
The HP 4284A ses an integrating A-D converter in the internal circuits to convert the analog signal to a digital signal. The integration time (INTEG TIME) is the time required to perform an A-D conversion. Generally, a longer conversion time will result in more stable and accurate measurement results. SHORT, MEDIUM or LONG integration times can be selected.
Front Panel Operation for Setting the Integration Time:
- Move the cursor to the INTEG field. The following softkeys will be displayed:
- SHORT
- MED
- LONG
- Use the preceding softkeys to select and set the integration time